Introduction
The flexible impeller in your engine's raw water pump is one of the smallest and cheapest parts on the boat, and one of the very few whose failure will stop you within minutes. It is a piece of moulded rubber the size of a bottle cap, and everything downstream of it — the heat exchanger, the exhaust elbow, the injection bend — depends on it doing its job every time you press the start button.
This guide covers what a flexible impeller does, why they fail, how to work out which one your engine takes (the part most people find hardest), and how to fit a new one properly. We have written it around the questions we are asked most often, and the identification section reflects the cross-referencing work we did while putting our impeller range together.
How A Flexible Impeller Works
Nearly every inboard marine engine — and every raw water cooled generator — draws seawater or river water in through a skin fitting, pushes it through a heat exchanger or engine block, and then injects it into the exhaust to cool and quieten the gases on the way out. The pump that does the drawing is almost always a flexible impeller pump, made by Jabsco, Johnson, Sherwood, Volvo Penta or one of the engine builders themselves.
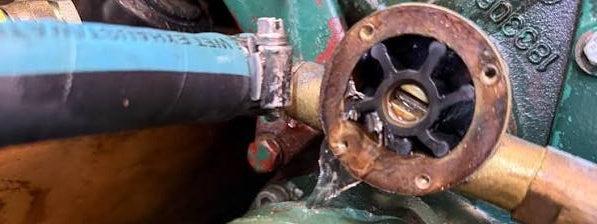
Inside the pump body is a rubber impeller: a central hub with a ring of flexible blades (or vanes) moulded around it. The pump body is not round — it has a raised section called the cam that intrudes into the bore, so the cavity the impeller runs in is deliberately eccentric.
As the shaft turns, each blade sweeps past the cam and is squashed flat against the hub, then springs back out again once it clears. That springing back is the whole trick. As the blade straightens, the space between it and the next blade grows, and that expanding volume creates suction at the inlet port. Water is drawn in and carried round in the pockets between the blades. When the blades reach the cam again the pockets shrink, and the water has nowhere to go but out of the discharge port.

The cam squashes each blade flat as it passes. The blade springing open again on the other side is what creates the suction.
Two consequences of that design matter enormously in practice:
- It is self-priming. A flexible impeller pump will pull water up from below the waterline against an empty hose, which is why it can be mounted above the water line and why the engine picks up cooling water within seconds of starting.
- It is positive displacement. Every rotation moves a fixed volume, so flow is roughly proportional to engine speed and the pump will happily pump against significant back pressure. It also means the pump cannot tolerate running dry, and that a blocked discharge has nowhere to vent.
The blades are also what seals the pump. They rub continuously against the bore, the cam and the wear plate at the back of the housing. That constant rubbing is lubricated and cooled entirely by the water flowing through. Take the water away and the impeller destroys itself very quickly indeed.
Why Impellers Fail
Impellers are consumable items, but the way an impeller fails tells you a great deal about the underlying cause. It is worth laying the old one on the bench, straightening it out and having a proper look before you fit the new one.

Four impellers, four different stories. The way yours failed tells you what to fix.
- Running dry. By far the most common killer. A closed seacock, a blocked strainer, a fouled skin fitting or an airlock after a lay-up will all starve the pump. Without water there is no lubrication and no cooling, and friction melts the blade tips within seconds. The signature is glazed, hardened, blackened tips, often with a smeared appearance where rubber has been dragged across the wear plate. Thirty seconds of dry running can be enough.
- Age hardening. Neoprene loses its elasticity over time whether the engine is used or not. An impeller that has been in the pump for five seasons may look intact but will have gone stiff, and stiff blades no longer spring back fast enough to prime. This is why a boat that ran fine in September can refuse to pick up water in April.
- Set. Left standing all winter with the blades folded over against the cam, the rubber takes a permanent bend. Priming is then weak, and the bent-over section becomes a stress raiser that cracks during the first few hours of running.
- Fatigue cracking and blade loss. Every revolution flexes each blade, and eventually cracks start at the root where the blade meets the hub. Once one blade tears off the rest follow quickly. This is the classic end-of-life failure, and the reason you must always account for every blade.
- Abrasion. Sand, silt and shell debris act like grinding paste. Boats that dry out on sand, operate in shallow estuaries or moor in silty rivers get noticeably shorter impeller life — look for uniformly worn-down blade tips and a scored wear plate.
- Chemical attack. Neoprene has only moderate resistance to oil, diesel and petrol, and will swell, soften and fail early where contamination is possible. Nitrile is the correct material for those duties.
- Worn pump internals. A pitted bore, a scored wear plate or a worn cam will chew through new impellers in short order. If you are replacing impellers far more often than expected, the pump itself is usually the reason.
Warning Signs Before Something Expensive Happens
An impeller rarely fails without notice. The earliest and most reliable indicator costs nothing to check: look over the transom within thirty seconds of starting and confirm you have a healthy flow of water out of the exhaust. Get into the habit and do it every single time. A weak, spitting or intermittent flow is telling you something well before any temperature gauge moves.
Other symptoms worth taking seriously: engine temperature creeping up, especially under load while remaining normal at tickover; steam or a hissing, dry-sounding exhaust note; a smell of hot rubber from the engine bay; and the engine picking up water only after being run at revs for a while, which is a classic sign of a hardened, poorly priming impeller. If the strainer bowl is not filling at all, the problem is upstream of the pump rather than in it.
Any of these is a reason to stop and investigate. Continuing to run a raw water cooled engine without cooling water will melt the exhaust hose and destroy the injection elbow long before it seizes the engine, and those are far more expensive than an impeller.
Identifying The Correct Replacement Impeller
This is where most people get stuck, and understandably so. Impellers are sold under a bewildering number of part numbers: the engine builder's, the pump maker's, and several aftermarket systems. A single physical impeller might carry a Jabsco number, a Johnson number, a Volvo Penta number, a Yanmar number, a CEF number and a Sierra number, all describing exactly the same piece of rubber.
Start with the pump, not the engine. This is the single most useful piece of advice we can give. Engine builders change pump suppliers during a production run, and two engines with the same model designation can take different impellers depending on the year of manufacture and which factory built them. The pump, on the other hand, is the thing the impeller actually has to fit. If there is a legible plate, casting mark or stamped number on the pump body — Jabsco 4528, Johnson F5B, Sherwood G-series and so on — that number will get you to the right impeller far more reliably than the engine model alone.
If the pump is unmarked, measure the old impeller. Four dimensions define an impeller, and if you have all four you can identify it with confidence. Use a vernier caliper and measure the old part, not the pump bore:
- Outside diameter — measured across the blade tips with the impeller relaxed and the blades straight. Straighten any bent blades by hand first, or you will read short.
- Length (or width) — the height of the impeller measured along the axis of the shaft, across the hub.
- Shaft bore (inside diameter) — the hole through the hub that the shaft passes through.
- Number of blades — count them. Impellers in this range run from 6 to 12 blades, and blade count is a quick and effective way to separate similar candidates.

Front and side views showing where each measurement is taken.
Our impeller listings carry all four figures, and the impellers collection can be filtered by diameter, blade count and drive type, so measuring the old part and then filtering is often the fastest route to a match.
Get the drive type right. The bore diameter alone is not enough — you also need the method by which the shaft turns the hub. The common types are:
- Spline drive — the bore has fine internal teeth engaging matching splines on the shaft. Common on Jabsco and Sherwood pumps.
- Pin drive — the bore has a slot or flat, and a pin or grub screw through the shaft locates in it. Common on smaller Johnson and Jabsco pumps.
- Keyway drive — a rectangular key sits in a slot in both shaft and hub.
- Square, D-shaped or flatted bore — the shaft profile itself drives the hub.

Looking into the hub bore. Check yours against these before ordering.
An impeller with the right diameter and the wrong drive will either not go on at all, or — worse — will go on loosely and spin on the shaft, which produces a pump that turns but moves no water.
Beware of impellers that look identical but are not. There are several pairs in common circulation that share an outside diameter and a length but differ in bore. You cannot tell them apart by eye. The example we flag most often is SM-2219 (CEF 100, Jabsco 4528-0001) and SM-2218 (CEF 121, Jabsco 22405-0001): physically the same outside, but 9.5mm bore against 12mm. Always confirm the bore.
 |
 |
| SM-2219 — CEF 100, Jabsco 4528-0001, 9.5mm bore | SM-2218 — CEF 121, Jabsco 22405-0001, 12mm bore |
Same outside diameter, same length, same blade count — and not interchangeable.
Watch for mid-series engine changes. Yanmar's small diesels are the textbook case. The older 2GM and 3GM engines use a smaller pump and impeller, while the later 2GM20F and 3GM30F moved to a larger pump from 1983 onwards. The engine plate is the only way to tell, so check for the F suffix and the 20/30 designation before ordering. Volvo Penta's MD and 2000-series ranges have similar changeover points.
Choose the right material. Two materials cover almost everything:
- Neoprene is the standard for engine raw water cooling. It has excellent flexibility, good memory and stands up well to seawater. Use it unless you have a specific reason not to.
- Nitrile should be used where oil, diesel or petrol may be present in the pumped fluid — bilge pumping, fuel transfer, some toilet and shower drain pumps. It is less lively than neoprene but chemically far more tolerant. Our SM-2199 (CEF 206) and SM-2221 (CEF 238) are the nitrile options in the range.
Use the cross-reference numbers. Every impeller in our range is listed against its CEF number and a full set of OEM equivalents — Jabsco, Johnson, Sherwood, Volvo Penta, Yanmar, Perkins, Vetus, Nanni, Onan, Sierra, JMP and others. If you have any number from an old box, a workshop invoice or an engine parts manual, searching that number on our site will normally take you straight to the right product.
Quick Reference: Common Engines And Their Impellers
The table below is a starting point for the most frequently asked-about applications. Please treat it as a shortlist rather than a final answer — always confirm against the dimensions and pump reference on the product page, particularly on older engines.
| Engine / pump | Impeller |
| Yanmar 1GM10; Onan small generators | SM-2207 — CEF 113 |
| Yanmar 2GM / 3GM (early); Volvo Penta MD & AQ; BUKH; Watermota; Universal Atomic 4 | SM-2219 — CEF 100 |
| Yanmar 2GM20F / 3GM30F; 2QM / 3QM; Kohler | SM-2210 — CEF 129 |
| Yanmar Y-series; Johnson F4B / F5B pumps | SM-2217 — CEF 101 |
| Volvo Penta 2001 / 2002 / 2003; Johnson F35B pump | SM-2218 — CEF 121 |
| Volvo Penta D1 & MD2 series; Johnson F4B pump | SM-2216 — CEF 116 |
| Yanmar 3JH / 4JH; Volvo Penta D2-50 to D2-75 | SM-2215 — CEF 107 |
| Jabsco F7B and 8170-series pumps (very widely fitted) | SM-2214 — CEF 106 |
| Vetus, Nanni, Beta Marine and similar compact diesels | SM-2196 — CEF 146 |
| Volvo Penta D6 / D9 / D11; Mercruiser CMD diesel | SM-2205 — CEF 177 |
| Volvo Penta petrol 3.0 / 4.3 / 5.7 inboard & stern drive | SM-2191 — CEF 189 |
| Volvo Penta petrol V6 / V8; Johnson F6B crank-mounted pump | SM-2203 — CEF 124 |
| Cummins 4B / 6B; Sherwood pumps | SM-2197 — CEF 167 |
| Perkins and other inboards on Sherwood G-series pumps | SM-2206 — CEF 103 |
| Solé Diesel Mini series | SM-2204 — CEF 123 |
| Jabsco Water Puppy; Jabsco 37010 electric toilets (nitrile) | SM-2221 — CEF 238 |
If your engine is not listed, or you are working from a part number rather than an engine model, please get in touch with the four dimensions or any old part number and we will identify it for you.
Removing The Old Impeller
Set aside an unhurried hour the first time. Once you have done it, most pumps are a twenty minute job.
- Close the seacock. Every time, without exception. Then hang a note over the ignition so you do not start the engine with it shut.
- Have a bowl and rags ready — the pump is full of water and it will come out.
- Photograph everything before you touch it: hose runs, cover orientation, and the direction the blades are curled. The blades trail behind the direction of rotation, and the new one must go in the same way.
- Remove the end cover. Usually four or six screws, slackened evenly. If the cover is corroded on, tap it gently — do not lever against the pump face, which is a sealing surface.
- Draw the impeller out. The proper tool is an impeller puller, which grips the hub and pulls squarely. Failing that, two pairs of water pump pliers on the hub, pulling straight out with a slight twist in the normal direction of rotation, will usually do it. Avoid levering with screwdrivers against the pump bore — it is soft, easily scored, and a scored bore leaks.
- Count the blades you have removed against the blade count for that part. If any are missing, stop and read the section below before going further.
- Inspect the pump. Check the bore for scoring and pitting, the cam for wear and security, and the wear plate at the back for grooves. Feel the shaft for end float or side play, which means the bearings and seal are going. Salt crystals or weeping around the shaft seal are the sign of a seal starting to pass.
- Clean the sealing faces, removing all traces of the old gasket from both the cover and the pump body.
Fitting The New Impeller
- Check the new impeller against the old one before it goes anywhere near the pump — diameter, length, bore, blade count and drive type. Two minutes now beats stripping the pump again.
- Lubricate generously. Coat the blades, the hub bore and the pump bore. Glycerine, washing-up liquid or a purpose-made impeller lubricant are all good choices. Avoid petroleum-based greases and oils on neoprene impellers — neoprene has only moderate resistance to hydrocarbons and they will shorten its life. (Nitrile impellers are unaffected, but there is no reason not to use glycerine on those too.) The lubricant is not optional: it eases fitting and, more importantly, protects the blades during the few seconds before water arrives on the first start.
- Fit the blades curling the right way. This is the step people get wrong. The blades must trail behind the direction of rotation — in other words, they should be bent the same way as the old one you photographed. Feed the impeller in and use your thumbs, a cable tie looped round the blades, or a smooth-jawed clamp to fold each blade over in turn as it enters the bore. Some fitters find it easier to start the blades over with a small strip of shim or a plastic cable tie drawn round the outside.
- Engage the drive properly. Push the impeller fully home and make sure the spline, key or pin has actually engaged. Turn the shaft or the engine by hand and confirm the impeller turns with it. An impeller that is not engaged will look perfectly installed and pump nothing at all.
- Always fit the new gasket or O-ring. Never reuse the old one and never substitute sealant for a gasket. On many pumps the gasket also sets the running clearance behind the cover, so thickness matters. Most of our impeller kits include the correct gasket.
- Refit the cover and tighten evenly. Work in a crisscross pattern and snug the screws progressively. These are usually small fasteners into a soft housing — firm is right, and over-tightening strips the threads or distorts the cover.
- Open the seacock. Then check the strainer is clear and the lid is properly sealed, since a leaking strainer lid will let the pump suck air.
The First Start After Fitting
Start the engine and go straight to the transom. You should see water at the exhaust within about thirty seconds. If you do not, shut down immediately — do not give it another minute to see if it clears.
The usual reasons for no flow after an impeller change are, in order of likelihood: seacock still shut, air trapped in the inlet (crack the strainer lid or the pump cover briefly to bleed it), impeller not engaged on the drive, blades fitted the wrong way round, or a gasket left out.
Once you have flow, check around the pump cover and hose connections for weeps, then run the engine up to temperature and check again. Note the date and engine hours somewhere you will find them next year.
If Blades Are Missing
Every blade that leaves the impeller has gone downstream, and it will lodge somewhere. Usually that is the inlet end of the heat exchanger tube stack, where even one or two fragments will reduce flow enough to cause overheating — and where they will slowly cook and become much harder to remove.
Account for every blade before you restart the engine. Reassemble the pieces you find against the hub like a jigsaw and confirm the count. If any are unaccounted for:
- Check the pump body itself, including behind the cam and under the wear plate
- Disconnect the hose from the pump outlet and check the run to the heat exchanger
- Remove the heat exchanger end cap. This is the most likely resting place, and while you are there is a sensible moment to replace the end cap O-rings and check the tube stack for scale
- Check the exhaust injection elbow if flow has been poor for a while
Running the engine with fragments in the system, having just fitted a perfectly good new impeller, is a common and thoroughly avoidable way to overheat.
How Often Should You Replace It?
Pump manufacturers' guidance is generally to replace at least annually, or sooner depending on duty. In practice, for typical UK and European leisure use:
- Inspect every season, at spring commissioning. Pull it, look at it, refit or replace it.
- Replace annually or every 200 running hours for engines in regular use, or where a failure would be genuinely inconvenient.
- Replace every two seasons is defensible for a lightly used engine in clean water with a good strainer, provided you actually inspect each year and the impeller comes out soft and undeformed.
- Replace regardless of age after any known dry running, after a season in silty or sandy water, or if the boat has stood unused for more than a year.
- Some owners remove the impeller for winter storage and refit it in spring, which prevents the blades taking a set. If you do this, put a large label on the ignition key. Others simply fit a new one each spring and accept the cost.
The single best investment alongside a fresh impeller is a spare impeller and gasket kept aboard, together with whatever tool you need to get the pump cover off. An impeller failure fifteen miles offshore is a different problem entirely from one on the pontoon, and the spare weighs nothing.
Finally, a well-fitted, properly lubricated impeller in a pump with a good bore and wear plate can last several seasons. If yours is not lasting, the pump — not the impeller — is usually where the problem lies.
A Short Checklist
- Check the transom for water flow within 30 seconds of every start
- Keep the raw water strainer clean and its lid sealing properly
- Identify replacements by the pump, backed up by measuring the old impeller
- Confirm outside diameter, length, bore, blade count and drive type before ordering
- Neoprene for engine cooling, nitrile where oil or fuel may be present
- Fit blades trailing the direction of rotation, well lubricated, with a new gasket
- Account for every blade before restarting
- Carry a spare
Our Impeller Range
We stock a range of quality neoprene and nitrile flexible impellers for raw water cooling pumps, supplied with gaskets and fixings where the application requires them, and listed with full OEM and CEF cross-references. You can browse and filter the range by diameter, blade count and drive type <here>.
If you are not sure which impeller you need, please get in touch with your engine make and model, any numbers you can find on the pump, and the four measurements from the old impeller if you have it out. We are always happy to help identify the right part.